Monday, April 6, 2015

Plan Carefully Before Building Your Own Shed

Shed
An outdoor shed can add beauty and needed storage for gardening tools and seasonal supplies. If you are handy with tools there are hundreds of plans to choose from with detailed building directions. Sheds large enough for riding mowers or attractive potting sheds can make your yard come alive in styles that correspond with the natural environment.

You can find hundreds of cheap or free shed plans online for building your own shed. But by planning ahead before you even order your plans can save you time and money. Gathering the necessary tools and supplies needed to perform the job should be a priority. Pricing materials that you want may come on sale or after looking at the new options in building materials today you may change your mind completely. For instance, cedar wood may be a dream of yours but after figuring the pricing and seeing the cedar-look available in other forms, you could quickly change your mind.

The overall design and proportionate properties also need to be measured against the distance of a home and other existing out buildings. Without proper placement, your brand new shed could appear odd and out of place. Take time to stake off the area where you are planning on building your new shed. Will the building be blocking any walkways or the view from a home window?

Scale down your measurements and transfer to paper along with other buildings and distances on your property. Consider the placement and height compared to buildings, shrubs and trees to make sure that your plan is symmetric and will flow easily. An open grassy area may seem the perfect spot to build a large, attractive shed with an attached porch but find out if there is a reason why nothing has been previously placed in this spot. Underground cables or septic tiles could be running under the ground. This would not be a fact to discover after your building has been permanently set.

Low-lying areas are another point to consider. Piling the dirt on may not be enough if your soil is sitting on a marshy patch. Have your soil checked to see what steps need to be taken to prevent a sinkhole. It may be impossible to build on this spot and better to find out before your shed begins to sink into the ground. An open grassy area may seem the perfect spot to build a large, attractive shed with an attached porch but find out if there is a reason why nothing has been previously placed in this spot. Underground cables or septic tiles could be running under the ground. This would not be a fact to discover after your building has been permanently set.

Make a list of your building options and potential problems that may occur. Building your own shed or as a family project can be rewarding or turn into a disaster. With proper planning your new shed will look great for many years.

DIY Resources:

Teds Woodworking
Created by Ted McGrath, "Teds Woodworking" is one of the most popular woodworking plans and projects packages online today.
More info here

Furniture Craft Plans
Over 9,000 premium woodworking furniture and craft plans that you can easily follow at home.
More info here

Home Made Power Plant
There are some other guides for DIY wind and solar generators, but all of those that I've read don't get into the same details.
More info here

My Boat Plans
My Boat Plans is a comprehensive collection of 518 boat plans, 40 videos and about 500 pages of boat building guides.
More info here

Chickens 4 Wealth
Absolutely everything you need to know to get started with backyard chickens and produce your own eggs.
More info here


Sunday, April 5, 2015

Simple Guidelines For A DIY Fence Project

DIY Fence
Building a fence is not brain surgery, but you really should start with a plan. In this article, you will find some useful tips that will help you get your new fence built. There will be some tools suggestions, such as which are the best impact drivers and which tool is best for digging holes for fence posts. You may not set a record for speed, but when you are done, you will have something to be proud of, a fence that will last you years.

The planning stage is extremely important in any DIY project, and fence construction is no different. There are plenty of online videos and tutorials to help you get started, but there are some very important decisions to make before you start.

Before you dig your first hole, make sure you check with your local building department and your local home owner's association to find out what rules and codes apply to your project. Some folks subscribe to the idea that they can plead ignorance and get away with not following the rules, but it may not go well with you. There are enough stories about fences and out-buildings that have had to be de-constructed because the home owner did not follow this simple advice.

You may also want to consider getting a set of plans for your fence. These usually come with a list of supplies and materials which will take the guesswork out of your DIY fence project.

As you calculate the amount of materials, you will have a fairly good idea of how much the project will cost. You don't want to be half-way through and discover you don't have enough money to finish.

A project that is large enough sometimes can justify getting a new tool or two. The idea is not to get tools just because you want to emulate "Tim-the-Toolman Taylor" but some tools can save you enough time and energy to justify the expense.

In the case of a fence, there will be a lot of fastening of boards together. This can be done with nails or screws. In the case of nails, a nail gun would be in order. If screws are used, a new impact driver will serve you well. Since this is a fairly new type of tool, make sure you do some research to find the best impact drivers for the kind of screws you will be using. This will save you lots of physical stress and exhaustion, especially if you are not used to the type of energy and muscle use involved in this kind of construction.

If you live in an area that experiences cold winters, you will want to know how deep the winter frost goes so you can get below that. Going below the frost line will help keep your posts in the ground. Digging your holes too shallow could result in the posts being pushed up when the ground freezes. Also use a string line to keep your fence straight. Set each post along the string. (Skip this step, and you will never hear the end of it from your spouse and your neighbours when your fence looks like the Snake River.)

Another tool that is very helpful is an auger. This is especially true if you live in an area with hard soil or lots of small rocks under the surface. If you do rent a post hole digger, employ the help of a friend. Two people handling an auger is so much easier than one because these tools are so bulky and hard to move by a single individual.

Finally, put a good coat of weather proofing on your finished lumber. You want your work to look good for as long as possible. New lumber looks good at first, but it only takes a few months to start turning grey. Take care of your fence, and it will give your years of use.

DIY Resources:

Teds Woodworking
Created by Ted McGrath, "Teds Woodworking" is one of the most popular woodworking plans and projects packages online today.
More info here

Furniture Craft Plans
Over 9,000 premium woodworking furniture and craft plans that you can easily follow at home.
More info here

Home Made Power Plant
There are some other guides for DIY wind and solar generators, but all of those that I've read don't get into the same details.
More info here

My Boat Plans
My Boat Plans is a comprehensive collection of 518 boat plans, 40 videos and about 500 pages of boat building guides.
More info here

Chickens 4 Wealth
Absolutely everything you need to know to get started with backyard chickens and produce your own eggs.
More info here


About the Author:
Building a fence can be a fun project. You can get your whole family involved. It can get ugly, though, if you don't have the best impact drivers or nail guns to make the work easier. Look at www.bestimpactdrivers.com to find the right one for your project.

Article Source: Simple Guidelines For A DIY Fence Project

Saturday, April 4, 2015

Above Ground Swimming Pools Are Easy To Maintain

Above Ground Swimming Pool
Adding a backyard pool offers a refreshing way to enjoy the heat throughout the summer and have fun with the family. A common issue with the backyard pool is the expense, especially if you're looking at the in-ground models. But a large pool needn't be so expensive if you are able to consider the wide-ranging benefits of the above ground swimming pool. They are much cheaper and take up a lot less space on the property.

Here are several qualities associated with the above ground swimming pool:

Budget-Friendly

A significant reason to consider investing in the above ground pools is the total expense. The cost to install the above ground pool and related equipment is about 25% the cost of installing the full size in-ground units. A big reason for the reduced cost relates to the installation process. Above ground pools are much easier to install on the surface of the backyard. They are also mass-produced which is certain to help with cutting costs compared to the individual or custom pools. The installation process is much shorter. An in-ground swimming pool might need 3 or 4 months to complete. This is easily cut down to 4 to 8 days for the above ground models. Costs are further saved by carrying out the installation work as a do-it-yourself project. This helps to cut costs associated with hiring the professional contractors.

Maintenance

The design of the above ground pools makes them straightforward to clean and maintain. The need to add cleaning chemicals and check the plumbing and filtration systems is much less compared to the in-ground models. Because the sides of the pool are high up, there is less chance the general day-to-day dirt and debris can cause a mess in the pool. Also, it is much easier to gain access to the pool equipment, which means it is easier to complete any repairs when required.

Safety

The above ground pool is a much safer design compared to the low-level in-ground units. To gain access to the above ground pools, it is necessary to have in place the proper type of ladder. When the pool isn't in use, the ladder is easily removed which prevents the small and curious children from attempting to take a look when they shouldn't. A cover and fence can further increase the safety level.

Portability

A further positive of the above ground pools is the ease in which they can be emptied, broken down and taken with you should you move home in the future.

DIY Resources:

Teds Woodworking
Created by Ted McGrath, "Teds Woodworking" is one of the most popular woodworking plans and projects packages online today.
More info here

Furniture Craft Plans
Over 9,000 premium woodworking furniture and craft plans that you can easily follow at home.
More info here

Home Made Power Plant
There are some other guides for DIY wind and solar generators, but all of those that I've read don't get into the same details.
More info here

My Boat Plans
My Boat Plans is a comprehensive collection of 518 boat plans, 40 videos and about 500 pages of boat building guides.
More info here

Chickens 4 Wealth
Absolutely everything you need to know to get started with backyard chickens and produce your own eggs.
More info here


About the Author:
Get a lot more information on the best pool service Lilydale companies for helping to maintain the look and function of the outside swimming pool.

Article Source: Above Ground Swimming Pools Are Easy To Maintain

5 Sanding Tips and Tricks

sand paper
Sanding a piece of wood can be a daunting task. Whether you're using a sander or sanding by hand, each has its flaws. Here are some sanding tips to consider:

1) If you're having a hard time sanding small pieces, try placing a rough piece of sand paper grit side up on a table. Next, place your wood piece on top of the sandpaper and continue sanding. The sandpaper on the table will grip the wood so you can sand with a finer grade.

2) When sanding irregular surfaced wood pieces with a palm sander, you can place a piece of sponge or weather stripping between the sanding sheet and the palm sander. This will allow the sand paper to flex more and get in to those tight spaces.

3) When sanding in tight and narrow spaces, try using a scrapper with a piece folded around the end of it. This will allow you to get in to those spaces with ease.

4) Save your small pieces of sand paper that look good but are just too small to use on their own. You can then glue them to a scrap piece of wood. This is a small trick but can save a lot of money on sand paper.

5) Regular sanding sheets burns away extremely fast when used with palm sanders. Instead, try using a sanding belt. You will need to cut it in to proper size pieces but they will last a lot longer than regular sanding sheets.

DIY Resources:

Teds Woodworking
Created by Ted McGrath, "Teds Woodworking" is one of the most popular woodworking plans and projects packages online today.
More info here

Furniture Craft Plans
Over 9,000 premium woodworking furniture and craft plans that you can easily follow at home.
More info here

Home Made Power Plant
There are some other guides for DIY wind and solar generators, but all of those that I've read don't get into the same details.
More info here

My Boat Plans
My Boat Plans is a comprehensive collection of 518 boat plans, 40 videos and about 500 pages of boat building guides.
More info here

Chickens 4 Wealth
Absolutely everything you need to know to get started with backyard chickens and produce your own eggs.
More info here

Friday, April 3, 2015

5 Pool Maintenance Mistakes to Avoid

Pool Maintenance
An in-ground or above ground swimming pool is certain to provide a lot of fun activities for the family. But to make sure the water stays clean and healthy, it is important to put in place the proper daily or weekly pool maintenance program. Here are five mistakes to avoid with pool maintenance:

pH Level 
Not testing the pH level at regular intervals. Testing the pH balance of the pool water is a daily routine. A daily pH check makes it possible to complete the simple adjustments. This means there is no need to make significant adjustments to the water chemistry after doing the more infrequent inspections.

Make sure the pH level is kept in balance. This should mean it is kept below 8.0. A pH level of 7.0 to 7.5 means the pool water is at the recommend range of chlorine at 50 to 70-percent active. Should the pH level reach 8.5 or more, the chlorine is in a poor state and only 10-percent active. By monitoring the pH balance regularly, you are in a better place to make sure the chlorine in the pool water is working effectively.

Alkalinity 
Not inspecting the alkalinity of the pool water. A preferred range of alkalinity is in the region of 80 to 140 parts per million (PPM). Alkalinity in the pool water that is too low or too high can impact the pH level. This can limit the ability for the chlorine in the swimming pool to act as a sanitizing agent.

Skimming Basket
Not inspecting and cleaning the skimmer basket. A regular inspection of the skimmer basket is necessary to prevent this important part getting blocked by dirt and debris. If the basket is left to get full and become blocked, it can result in poor pool circulation.

Add Chemicals 
Avoid adding chemicals like chlorine or bromine to the pool water in the heat of the day. The preferred time to include chemicals is later in the day. Ideally you should leave it until the sun has set. By waiting for the evening to arrive, there is much less chance the chemicals will evaporate.

Wall Surfaces
Not cleaning the tile or wall surfaces enough. A regular brushing of the tiles is certain to help limit the outbreak of conditions like algae. Also, the regular cleaning can help to avoid the serious and expensive issues like the surface getting calcified. This is a type of job that needs the services of the professional contractor and can be expensive.

DIY Resources:

Teds Woodworking
Created by Ted McGrath, "Teds Woodworking" is one of the most popular woodworking plans and projects packages online today.
More info here

Furniture Craft Plans
Over 9,000 premium woodworking furniture and craft plans that you can easily follow at home.
More info here

Home Made Power Plant
There are some other guides for DIY wind and solar generators, but all of those that I've read don't get into the same details.
More info here

My Boat Plans
My Boat Plans is a comprehensive collection of 518 boat plans, 40 videos and about 500 pages of boat building guides.
More info here

Chickens 4 Wealth
Absolutely everything you need to know to get started with backyard chickens and produce your own eggs.
More info here


About the Author:
Get a lot more information on the most-effective pool service Kilsyth company for providing a variety of cleaning options to maintain the appearance of the outside pool.

Article Source: 5 Pool Maintenance Mistakes to Avoid

Friday, March 27, 2015

How to Hang a Painting

A good question to ask, always, before purchasing any kind of art to hang on your wall, is: Do I have the wall space?

If you're like me, very familiar with certain measurements because you see them all the time, like 16" x 20", 24" x 36", etc. then you might be able to tell at a glance whether or not there's room on your blank wall to hang a painting.

But chances are most people will need to measure to make sure. Aside from just measuring the wall with a measuring tape, I would also recommend taking it one step further to really get an idea of what a painting of a certain size would look like in that spot.

Take a large sheet of scrap cardboard, poster board, or anything you can get your hands on that's large enough. It can be destined for the trash—doesn't matter. You may have to take several sheets of paper and tape them together. Just figure out a way to create a rectangle the exact size of the painting. You can then hold this up on the wall and really visualize what it'll be like.

Placement of artwork is no sweat if you've got a natural talent for interior design. This is for those of us who don't:

The painting should not take up all of the available space, if you can help it. It is good to have a certain amount of what I call "buffer" around the painting to give a place for the eye to rest.

Here's what it looks like when you don't leave enough "buffer."

How to Hang a Painting


If you have a large wall, don't be afraid to leave some of it blank. When you do this it showcases the artwork more elegantly. (If you've ever walked into an upscale art gallery, you know what I mean. Such spaces normally have gleaming wooden floors, clean white walls, excellent lighting, and little more. Artwork in this setting takes on a feeling of importance, as there is often just one painting per wall.)

At the same time, you also want the artwork to make a statement. If you hang a small painting on a large wall, it may not have the kind of visual impact you're looking for.

Here's what happens when the painting is too small for the wall.

How to Hang a Painting


So when you're decorating, try to choose artwork for your space that is not too big, not too small, but just right.

How to Hang a Painting


Once you've selected your new artwork, determined where it will go, and finally got it home, hanging it on the wall is a simple, if specific, process.

How to Hang a Painting

You will need a picture hanging hook, a pencil, a measuring tape, a hammer and a level.

The first thing you need to do is find the point on your wall where you want the centre of the painting to be. You may need to measure if you want it exactly centred on a wall, but in most cases it is okay to eyeball it. Mark the spot with a piece of masking tape or a small pencil mark.

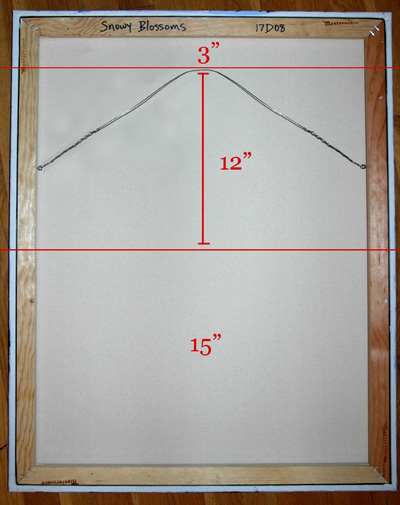
Then measure the length of the painting (from top to bottom) and find the midpoint by dividing that number in half. Say your painting is 30" high x 24" wide. The vertical midpoint would be 15" from both the top and bottom edges. You want this imaginary line to be at eye level when the painting is hung on the wall.

How to Hang a Painting

 The average person's eye level is at about 60" from the floor. If you are taller or shorter than average, you can use a measuring tape to figure out where your eye level is. Let's assume in this case that it's 60".

The back of the painting should have a hanging wire installed. (If it doesn't, you can get picture hanging wire and screw eyes from a hardware store. The screw eyes should always go about 1/3 of the way down from the top edge of the painting, the wire should be at least 2" from the top edge of the painting when pulled taut, and it should be coiled tightly and neatly so it's secure. But that's a whole other subject.)


Hanging Art 2

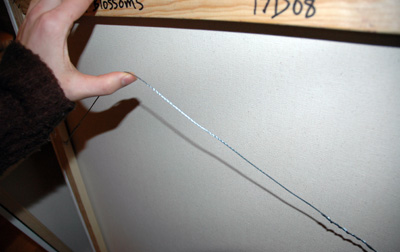
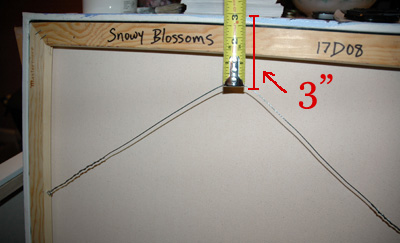
You want to pull the wire up towards the centre of the painting's top edge, just as if it were hanging on the wall and gravity were pulling it taut. Measure the distance from the wire to the top edge of the painting.


Hanging Art 3

The number you need is the measurement from the "eye level" line, or vertical midpoint, to the point where the wire will hang on the hook. To get this number, subtract 3" from 15", to get 12". This is how high above eye level you will need to place the bottom of the hook.


Hanging Art 4

So add 12" to your eye level measurement of 60". You will place the bottom of the hook for this painting at 72" from the floor. Mark this spot with a pencil dot.

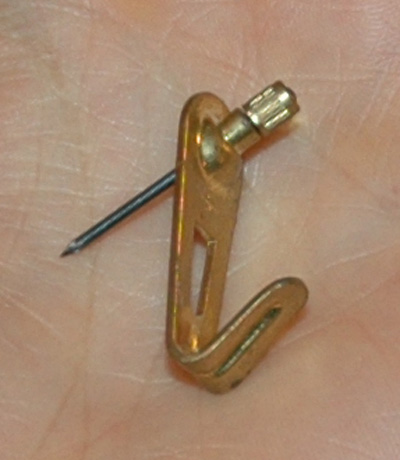
Picture hanging hooks can be purchased at any hardware store. The ones I use look like this.


The nail goes in at an angle to really anchor it into the wall. If you are hanging a heavy piece of art, make sure to use hooks that are rated for the proper weight. I don't recommend using nails because the wire can slip off of a nail. With a hook there is no chance of that.

Hanging Art 5

If you've measured correctly, when you hang the painting by its wire on the hook, the centre of the painting should be exactly at eye level. (If you're off by a half inch, don't stress about it--you won't be able to tell by looking.) Use a level to make sure it's hung straight.


Hanging Art 6

Note: 
If a painting is much wider than it is high, for example, 24" high x 48" wide, the canvas will usually have a cross-brace in the middle. In these cases you will have to hang the painting from 2 hooks, one on either side of the cross-brace. When pulling the wire taut to measure its distance from the top edge, you'll just have to pull it taut across 2 points. It's a little tricky but if you understand the theory, you'll be able to get an accurate measurement. The important thing in those cases is to use a level when installing the 2 hooks to ensure that they are placed in line with each other.

Of course a painting does not always have to be at eye level—for example, if you are hanging it above a piece of furniture or in a configuration with other paintings, eye level becomes less important. In those cases it is usually best to eyeball it. But once you figure out where you want the centre of the painting, you can still use this method to figure out exactly where the hook should go.

Hopefully this info will be helpful to you next time you're hanging a painting, photograph, or mirror.

DIY Resources:

Teds Woodworking
Created by Ted McGrath, "Teds Woodworking" is one of the most popular woodworking plans and projects packages online today.
More info here

Furniture Craft Plans
Over 9,000 premium woodworking furniture and craft plans that you can easily follow at home.
More info here

Home Made Power Plant
There are some other guides for DIY wind and solar generators, but all of those that I've read don't get into the same details.
More info here

My Boat Plans
My Boat Plans is a comprehensive collection of 518 boat plans, 40 videos and about 500 pages of boat building guides.
More info here

Chickens 4 Wealth
Absolutely everything you need to know to get started with backyard chickens and produce your own eggs.
More info here


About the Author:
Cedar Lee is an artist based in Maryland. She paints vivid, dramatic landscapes, colorful flowers, and portraits by commission.

Cedar's website: ArtByCedar.com

Cedar's blog: ArtByCedar.com/blog

Article Source: How to Hang a Painting

10 Tips to Make Cleaning Your Kitchen Easier

Cleaning Your Kitchen


I don't know about you, but I spend a lot of time in my kitchen each and every day.

I rarely use box mixes and usually make our food from scratch so my kitchen gets a daily work out!

I am cleaning something up in my kitchen every day, I believe your kitchen should be one of the cleanest rooms in your home, after all, germs seem to accumulate there and its important to keep it clean.

Here are some nifty kitchen cleaning tips that I thought I would share with you today.

1. Cleaning And Deodorizing Your Garbage Disposal:
You should never let food particles sit in your garbage disposal, always turn it on and use it after putting food down into the unit. Letting food sit there, will cause odours. Every few days I cut up a half of piece of citrus fruit (rinds work best) and put that down into my garbage disposal unit. I let it sit for approximately 30 minutes and then start running my water and turn the unit on to grind up the citrus rind. This not only cleans the unit but also removes smelly odours. I never put onions or other smelly foods down into my garbage disposal unit.

2. Cutting Boards:
I use several different types of cutting boards, depending on what I am cutting up at the time. You should have a minimum of 3 different cutting boards in your kitchen. (one for raw meats, one for cooked meats and one for cutting up vegetables and other things). I am able to put two of my cutting boards directly into my dishwasher for cleaning. My third cutting board needs to be hand cleaned after I use it and one of the best ways of doing that is by using antibacterial liquid hand dish washing soap and a damp sponge or microfibre cleaning cloth. Rinse your board thoroughly after cleaning. To remove odours from your cutting boards try using a half of a lemon dipped in salt and then rub that over the top of your cutting board and letting it sit for 10 minutes before rinsing your cutting board off under warm running water.

3. Cleaning Bakeware:
I always follow manufacturers cleaning instructions, you can find that printed on the label of the bakeware that you purchase. However, if that information is missing, you should never use abrasive cleaners. For stubborn baked on grime, you can soak your bakeware in hot soapy water or try some warm water with 2 tablespoons of baking soda in it. I like to let mine sit and soak for approximately 20 minutes and then I use a soft sponge to finish cleaning them up. You should never allow metal bakeware to air dry as that can cause pitting and rusting. Always towel dry with a soft absorbent cloth.

4. Glass Carafes, Decanters And Coffee Pots:
One of the best ways to keep these items clean is to use warm soapy water and a soft sponge. For stubborn stains and food debris, try cleaning them with one of those fizzing denture cleaner tablets.

5. China And Porcelain Dishes:
The best way to clean these items is by hand, they should never be put into your automatic dishwasher. I like to hand wash mine in warm soapy water. To prevent chipping and breakage, I line my sink with a rubber sink mat. Dry them with a soft clean and dry cloth.

6. Cleaning Metal Freezer Racks:
One of the best tips I have ever received about cleaning metal freezer racks came from my great aunt. Remove the metal racks from your freezer after defrosting it. Clean them in warm soapy water and rinse. Towel dry them. Take an old plastic tablecloth or a plastic drop cloth and lay it outside in a clean area. Take your metal freezer racks outside and place them on top of your plastic cloth. Next, take a can of nonstick baking spray and lightly mist your racks. Let them air dry for 5 minutes. Place them back into your freezer. This will help to prevent food packages and other gunk from sticking on your metal racks in the future.

7. Cleaning The Inside Of Your Refrigerator:
One of the best ways to do this is to remove all food, beverage and condiment items and place them on your counter top. Next, remove any removable shelving and drawers. Wash the shelving and drawers in hot soapy water, rinse and towel dry. Fill up a clean bucket with some warm water and a 1/4 cup of baking soda. Take a clean sponge and wipe out the inside of your refrigerator before placing the shelves and drawers back inside it. Another alternative is using 5 parts water and 1 part white vinegar to wipe out the inside of your refrigerator.

8. Ceramic Tiles:
I have a ceramic tile backsplash behind my sink and also behind my stove top so its constantly getting splashed with grease and food debris. The best way I have found is to clean the ceramic tiles every day by using liquid dishwashing soap and a damp clean sponge. If you let the grime build up on the ceramic tiles, it will be harder to clean. To clean stubborn dried on grime, use an all-purpose spray cleaner.

9. Microwave:
Fill a microwave safe glass container with 1 cup of water and 1/4 cup of lemon juice. Microwave on HIGH for 1 minute. The steam will help loosen stuck on food products and splatters for easy cleaning. The Lemon also is a natural deodorizer. After wiping out your microwave, dry the inside with a soft dry cloth. I find using microfibre cleaning cloths and towels great to use when cleaning the microwave oven.

10. Coffee Makers:
Since we are a household that drinks coffee every day, our coffee maker constantly needs a good cleaning. After every use, you should be cleaning out the coffee pot and filter basket. You can do this by rinsing it out with hot soapy water. Just make sure you rinse it out completely. For stubborn stains, try sprinkling some baking soda onto a damp sponge and scrubbing the spot. Wipe up drips as soon as they happen.

I hope you find some of my cleaning tips helpful. I am a firm believer in cleaning up messes as I go along and not letting them sit for another day.

DIY Resources:

Teds Woodworking
Created by Ted McGrath, "Teds Woodworking" is one of the most popular woodworking plans and projects packages online today.
More info here

Furniture Craft Plans
Over 9,000 premium woodworking furniture and craft plans that you can easily follow at home.
More info here

Home Made Power Plant
There are some other guides for DIY wind and solar generators, but all of those that I've read don't get into the same details.
More info here

My Boat Plans
My Boat Plans is a comprehensive collection of 518 boat plans, 40 videos and about 500 pages of boat building guides.
More info here

Chickens 4 Wealth
Absolutely everything you need to know to get started with backyard chickens and produce your own eggs.
More info here


About the Author:
Shelly Hill has been working from home in Direct Sales since 1989. Shelly is a Manager with Tupperware.

You can contact Shelly at:
Web: http://www.classybusinesswomen.com
Recipe Blog: http://wahmshelly.blogspot.com

Article Source: 10 Tips to Make Cleaning Your Kitchen Easier
DIYBikeRepair